Create and configure a fabric group & Select compute resources to include in the fabric group
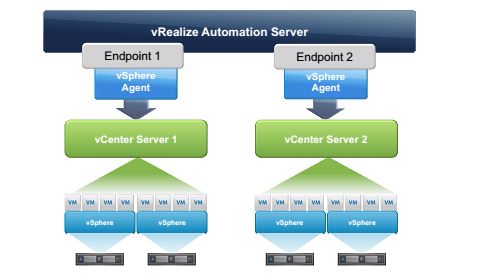
The fabric includes all the compute resources that are discovered by endpoint data collection. The fabric is organised into fabric groups for provisioning.
As detailed in section 2.1 The fabric is accessible by all tenants and as such Fabric Group resources can be made available to users who belong to business groups in all tenants. In most scenarios it would be common for the Fabric (Endpoints and Fabric Groups) to be configured in the default Tenant and Tenants access the fabric through reservations.
To clarify, if we have 3 Tenants. Tenant A, Tenant B and Tenant C and the IAAS Administrator of Tenant C created a Fabric Group within Tenant C, then that Fabric Group would be also be available to Tenant B & Tenant A. Commonly this is why the IAAS Administrator, System Administrator and possibly the Fabric Administrator role would belong to a member of IT and the Fabric Groups would be created in the Default Tenant.
To Create a Fabric Group you need to be an IAAS Administrator, this maybe confusing as there is a Fabric Administrator role and it would seem Logical that the Fabric Administrator would create a Fabric Group, however that is not the case.
As we have an IAAS Administrator (Infrastructure Admin) the Infrastructure Admin creates a Fabric Group which is essentially a logical group of infrastructure, if we look at it that way it makes more sense. The IAAS Administrator (Infrastructure Admin) is responsible for creating groups of infrastructure where as the Fabric Administrator is assigned to that group of infrastructure (Fabric Group) to manage amongst other things who has access to that Infrastructure group.
I will reiterate again that learning the vRA roles is very important (details in section 2.1)
To create the Fabric Group, log in as an IAAS Administrator browse to the Infrastructure Tab Select Endpoints>Fabric Groups>New

Since I only have a single compute resource configured in my lab (vCenter) then I can only select this compute resource. Assign a Fabric Administrator and give a Name to the Fabric Group.
- If you’re following along in your lab and the compute resource section is blank despite adding an Endpoint then check for this issue.
Configure compute resource Data Collection
Depending on your setup, you may need to log in and out of the tenant to be assigned the Fabric Administrator role. The Required Tabs wont appear until you have done this.
As the Fabric Administrator you will gain a number of new options within the Infrastructure TAB where you can manage the Fabric Group resources you are now responsible for.
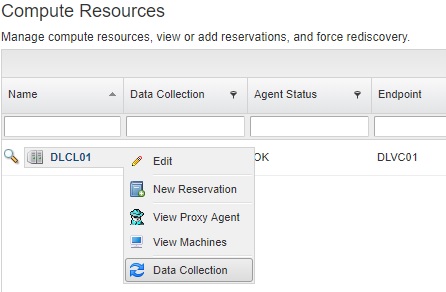
Under Infrastructure > Compute Resources > Compute Resources
We can now see the Compute Resources from the Fabric Groups we are responsible for

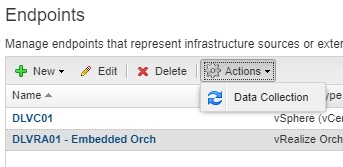
Ensure that Data Collection is working by clicking the magnifying glass and viewing the info of that compute resource

You can kick off data collection for the compute resource if the info fields haven’t populated by clicking the right facing arrow and selecting Data Collection.
Here we can configure the default Data Collection frequency. By default Inventory, Performance and Network Security Inventory are done daily. It’s worth changing these times to match the requirements of your environment. Keep in mind the impact of collections performed too regularly. As my lab environment is very small I have set my collection times to every hour, you could also come here to request immediate data collection if required

- If you’re following along in your lab and Data Collection isn’t working on your compute resource then check for this issue.
Create a vSphere reservation & Assign a business group to the vSphere reservation
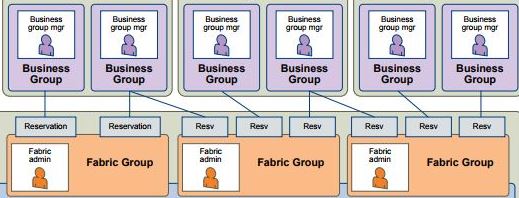
Reservations are created by the Fabric Administrator, They are a share of provisioning resources allocated by the fabric administrator from a fabric group and reserved for use by a particular business group.
Each Reservation is for a single business group, a business group can have multiple reservations.
A reservation is a share of the memory, CPU, networking, and storage resources of one compute resource allocated to a particular business group. If we had a vCenter with a total of 96GB of RAM available and 3 Business Groups, we could create 3 reservations on the same compute resource, 1 reservation for each Business Group and assign each reservation 32GB of RAM, so each business group has 32GB of RAM available. vRA reservations are different to vSphere reservations, in that vRA reservations are about what resources are AVAILABLE to a business group rather than guaranteeing that resource to a business group.
Create a reservation under Infrastructure>Reservations>Reservations using the Fabric Administrator role.

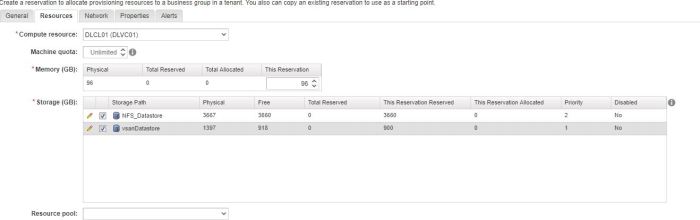
Select the appropriate vRA resource you want to create a reservation on.

On the general Tab, give the reservation a Name, select which Tenant you wish to create the reservation for. Remember that Fabric and Fabric Groups are available to all tenants, as a reservation links Fabric Groups to Business Groups, it makes sense that a reservation can be created in Tenant A for a Fabric Group in Tenant B.
Reservation policies are a way to guarantee that the selected reservation satisfies additional requirements for provisioning machines from a specific blueprint. For example, if a blueprint uses a specific VM Template, you can use reservation policies to limit provisioning to a reservation linked to a vCenter endpoint that has that VM Template available.
Select the Priority, if the Business Group is provisioning a machine and has multiple vCenter reservations then this priority will set the provisioning preference.
Ensure that the reservation is enabled.
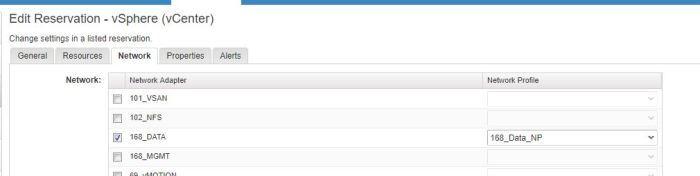
On the resources tab, select the Compute Resource you wish to create a reservation for and complete the required fields
The Machine Quota field limits the number of Machines (VMS) that can be provisioned using this reservation.
The Network tab contains information relating to which networks (port groups) are available to the business group when provisioning virtual machines, This will be explained in the network profile types objective below., for now I just selected a single port group.
The properties tab is where we can assign custom properties to the reservation, custom properties are covered in section 1.1
Once a reservation is assigned to a Business Group we can see the business groups quota allocation used from Administration>Users & Groups>Business Groups

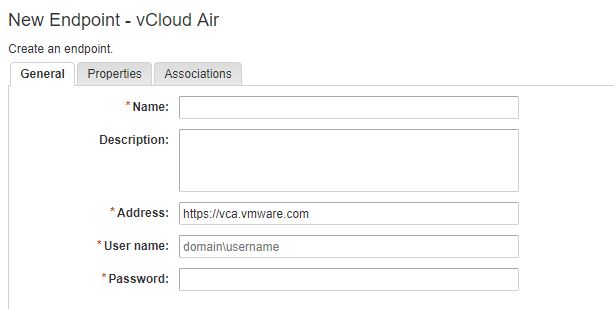
Create a vCloud Air Reservation
vCloud Air Reservations are created in the same manor as vCenter reservations with the exception that you select vCloud Air from the vRA Resource Types.
Create and configure network profile types
First and foremost there’s a really good blog post from VMware on use cases for Network Profiles here.
- External network profiles
Essentially an External Network is a pre-existing subnet within your environment that can be VXLAN\VLAN backed, it’s already deployed and an IP range is already assigned to the network. The Network Profile will specify the existing gateway of that subnet, the subnet mask and the available IP range on that network.
- NAT network profiles
Used when deploying networks with overlapping IPs, dynamically provisioning an NSX edge to NAT to these networks externally. You need an external network profile (next hop network) in order to create a NAT network profile, the specified external network will be where the newly deployed NSX edge GW will attach it’s Uplink, all other provisioned networks will be attached to an NSX LIF.
- Routed network profile
When deploying networks behind a pre-existing NSX DLR and wanting those networks to dynamically route out an up stream NSX Edge. You need an external network profile (next hop network) in order to create a routed network profile, the DLR will use the GW IP specified in the external network profile to distribute the new network routes to.
Network Profiles are created within Infrastructure>Reservations>Network Profiles
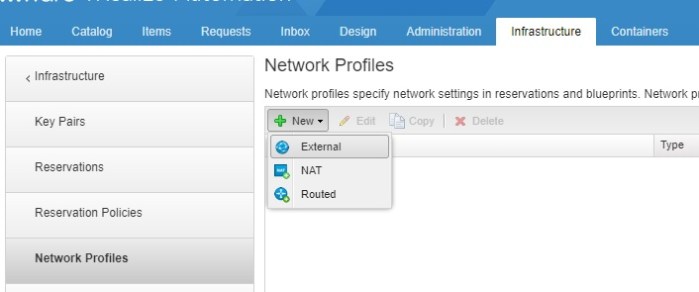
Select the profile type you want to create, here we are selecting External Network
Complete the required tabs
General
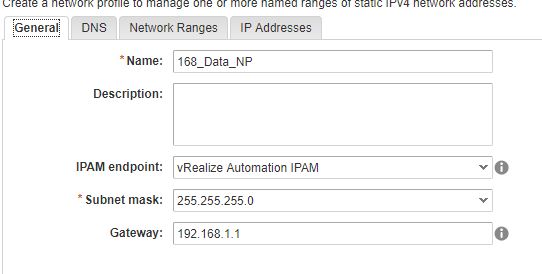
DNS

Network Ranges

Once this has been completed we can assign it to a network within a business group reservation from the Network tab, a machine provisioned using this reservation resource on the 168_DATA network will now receive it’s IP settings from the 168_DATA_NP network profile.
In order to create NAT & Routed network profiles you really need to have an understanding of what you’re trying to achieve, I will link another blog about NAT & Routed Network Profiles and how it relates to my lab environment later, this should hopefully help the concept of these profiles stick.
Create and configure machine prefixes
Machine Prefixes are used to generate names of provisioned machines and are shared across all tenants. Fabric administrators are responsible for managing machine prefixes. Every business group has a default machine prefix and every blueprint must also have a machine prefix, if no prefix is specified in the blueprint it will use the default prefix specified in the business group.
Machine Prefixes relating to Blueprints is covered in Section 1 Objective 1.1
You specify a number of digits to each prefix and then the next number. With a machine prefix of DLVRA a number of digits of 3 and then the next number of 1, the first Machine provisioned will be DLVRA001 and the next DLVRA002 and so on.
Prefixes are created under Infrastructure>Administration>Machine Prefixes by the Fabric Administartor

Ensure that all business groups have been assigned a Default Prefix, Machine prefixes was also covered in Section 2.3
Tools